这篇文章主要介绍了Babel 编译产物剖析、switch 状态机、V8 挂起机制、参数传递真相
前言
上一篇我们讲了 Generator 的概念和语法——function* 声明、yield 暂停、next() 恢复。但是还有疑问点:
JS 引擎到底是怎么做到「暂停」一个函数的?
一个函数执行到一半挂起,它的调用栈、局部变量、执行位置是怎么保存的?yield 在底层到底发生了什么?next(value) 的参数又是怎么精确赋给「上一次暂停的那个 yield 表达式」的?
从以下两个角度来解释疑点:
- Babel 编译视角:把 Generator 编译成 ES5 代码后,它变成了什么?
- V8 引擎视角:现代引擎原生支持 Generator 时,底层是怎么实现的?
先从Babel开始——因为它把 Generator 编译成了更容易理解的 JavaScript 代码。
一、Babel 编译:Generator 变成了什么?
1.1 先看一段最简单的 Generator
1
2
3
4
5
6
7
8
9
10
function* helloWorldGenerator() {
  yield 'hello';
  yield 'world';
  return 'ending';
}

const hw = helloWorldGenerator();
console.log(hw.next()); // { value: 'hello', done: false }
console.log(hw.next()); // { value: 'world', done: false }
console.log(hw.next()); // { value: 'ending', done: true }
在原生支持 Generator 的引擎里(比如现代 V8),这段代码由引擎直接处理。但在 ES5 时代,Babel 需要把它编译成等价的 ES5 代码——用到的工具是 @babel/plugin-transform-regenerator,底层依赖 Facebook 的 regenerator 库。
1.2 编译产物
1
2
3
4
5
6
7
8
9
10
11
12
13
14
15
16
17
18
19
20
21
22
23
24
25
var _marked = /*#__PURE__*/ regeneratorRuntime.mark(helloWorldGenerator);

function helloWorldGenerator() {
  return regeneratorRuntime.wrap(function helloWorldGenerator$(_context) {
    while (1) {
      switch (_context.prev = _context.next) {
        case 0:
          _context.next = 2;
          return 'hello';

        case 2:
          _context.next = 4;
          return 'world';

        case 4:
          _context.next = 6;
          return 'ending';

        case 6:
        case "end":
          return _context.stop();
      }
    }
  }, _marked);
}
看到关键了吗?Generator 被编译成了一个 switch 语句构成的状态机。
每个 yield 变成了一个 case 分支,每个 case 做三件事:
- 设置
_context.next(下次该跳到哪个 case) return一个值(产出值给外部)- 退出函数(这就是「暂停」)
1.3 逐步分析 mark + wrap + switch
编译产物由三部分组成,我们逐个拆。
regeneratorRuntime.mark
1
var _marked = regeneratorRuntime.mark(helloWorldGenerator);
mark 函数的作用是给 Generator 函数打标记——设置原型链,让 helloWorldGenerator() 返回的对象天然拥有 .next()、.throw()、.return() 方法。
简化后的实现:
1
2
3
4
5
function mark(genFunc) {
  genFunc.__proto__ = GeneratorFunctionPrototype;
  genFunc.prototype = Object.create(Gp);
  return genFunc;
}
这部分不复杂,就是原型链操作。真正的核心在 wrap。
regeneratorRuntime.wrap
1
2
3
4
5
6
function helloWorldGenerator() {
  return regeneratorRuntime.wrap(
    function helloWorldGenerator$(_context) { ... },
    _marked
  );
}
wrap 接收两个参数:
- 内部函数(
helloWorldGenerator$)——就是那个 switch 状态机 - 外部标记(
_marked)——Generator 函数本身
它的作用是创建一个遍历器对象,内部持有一个 _context(执行上下文)。每次调用 .next() 时,把控制权交给内部函数的 switch 语句。
简化后的 wrap 实现:
1
2
3
4
5
6
7
8
9
10
11
12
13
14
15
16
17
18
19
20
21
22
23
function wrap(innerFn, outerFn) {
  var generator = Object.create(outerFn.prototype);
  var context = {
    prev: 0,     // 上一个 case 的索引
    next: 0,     // 下一个要执行的 case
    done: false, // 是否结束
    stop: function() { this.done = true; },
    // ...其他方法
  };

  generator.next = function(value) {
    context.sent = value;     // 把 next(value) 的参数存起来
    return innerFn(context);  // 调用 switch 状态机
  };

  generator.throw = function(err) {
    context.sent = err;
    context.method = 'throw';
    return innerFn(context);
  };

  return generator;
}
generator.next(value) 做了两件事——先把 value 存入 context.sent,再调用内部函数。
switch 状态机
这是最核心的部分:
1
2
3
4
5
6
7
8
9
10
11
12
13
14
15
16
17
18
19
20
21
function helloWorldGenerator$(_context) {
  while (1) {
    switch (_context.prev = _context.next) {
      case 0:
        _context.next = 2;
        return 'hello';

      case 2:
        _context.next = 4;
        return 'world';

      case 4:
        _context.next = 6;
        return 'ending';

      case 6:
      case "end":
        return _context.stop();
    }
  }
}
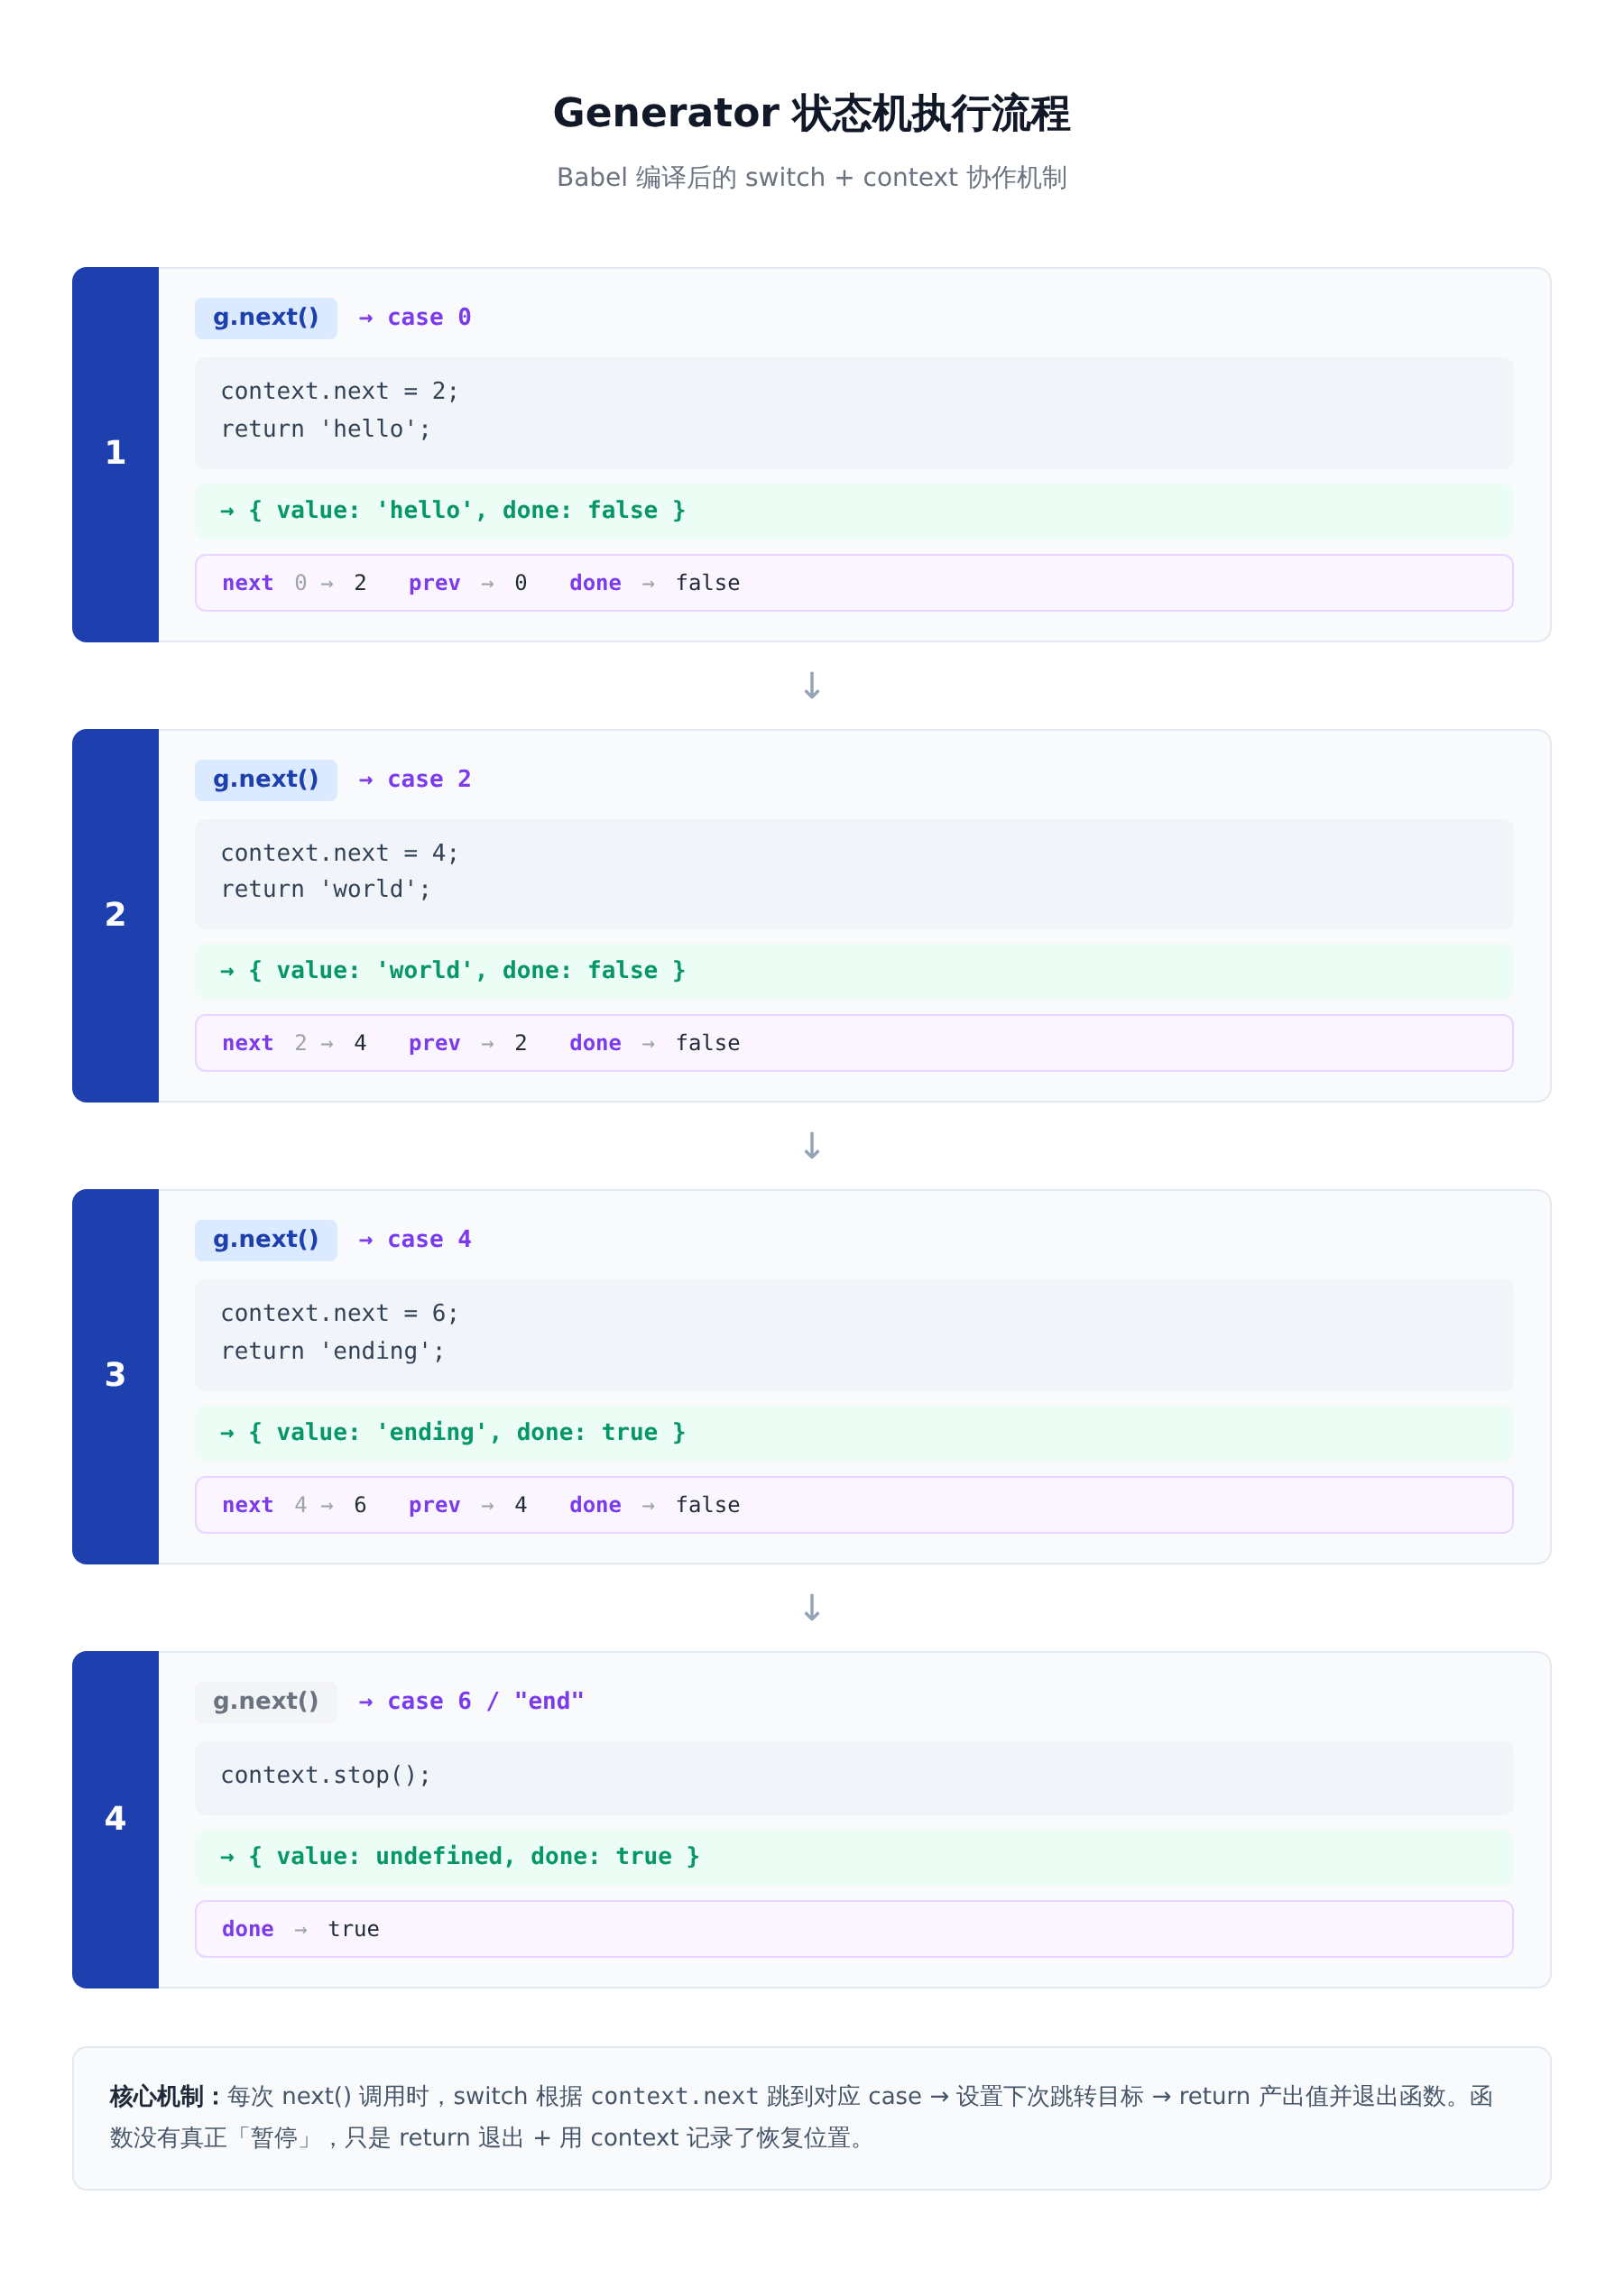
逐步追踪四次 next() 调用:
第一次 next():
_context.next初始值为0,进入case 0_context.next = 2—— 设置下次跳转的目标return 'hello'—— 产出值并退出函数- 返回
{ value: 'hello', done: false }
第二次 next():
_context.prev = _context.next→_context.prev = 2,进入case 2_context.next = 4—— 设置下次跳转目标return 'world'—— 产出值并退出- 返回
{ value: 'world', done: false }
第三次 next():
- 进入
case 4 _context.next = 6return 'ending'- 返回
{ value: 'ending', done: true }
第四次 next():
- 进入
case 6/case "end" - 调用
_context.stop(),设置done = true - 返回
{ value: undefined, done: true }
二、状态机:Generator 的本质
2.1 什么是状态机
状态机(Finite State Machine,FSM)是一个数学概念,核心思想是:一个系统在任意时刻只处于一个「状态」,收到「输入」后根据当前状态跳到下一个状态。
举个生活中的例子——红绿灯就是一个状态机:
1
绿灯 →(时间到)→ 黄灯 →(时间到)→ 红灯 →(时间到)→ 绿灯 → ...
每个时刻只亮一种灯,「时间到」是触发状态跳转的输入。当前是什么灯,决定了下一次亮什么灯。
2.2 Generator 为什么天然是状态机
Generator 函数的执行过程天然对应一个状态机——每个 yield 就是一个状态分割点,把函数体切分成若干执行片段:
1
2
3
4
5
function* gen() {
  yield 'hello';   // 执行片段 0 → 产出 hello,切换到片段 1
  yield 'world';   // 执行片段 1 → 产出 world,切换到片段 2
  return 'ending'; // 执行片段 2 → 产出 ending,进入终态
}
状态流转关系如下:
1
2
3
片段0 ──next()──> 产出 'hello',下一入口指向片段1
片段1 ──next()──> 产出 'world',下一入口指向片段2
片段2 ──next()──> 产出 'ending',下一入口指向终态
Babel 做的事情,就是把每个执行片段映射成一个 case 分支,用 _context.next 这个数字记录 「下一次恢复时该从哪个 case 进入」(注意不是当前状态,而是下一个状态)。每个 case 的第一件事就是设置 _context.next,为下一次恢复指明方向。
2.3 暂停的真相
上面的执行过程,每次 next() 调用进入对应的 case,执行到 return 就退出函数了。在 Babel 编译的模拟方案中,函数根本没有“暂停”——它直接 return 退出了。
只是在退出前,_context.next 记录了“下次该从哪个 case 进入”,同时局部变量的值也保存在 context 对象中(比如 a、b)。
这就像你读到一本书的第 10 页放下了,但在第 10 页夹了书签——书本身没有“暂停”,是你记住了位置。下次翻开书,直接翻到第 10 页继续读。
所以,Babel 方案下 Generator 的“暂停”和“恢复”,本质是:
- 暂停 =
return退出函数 + 用context.next记录下次的入口(并保存所有局部状态) - 恢复 = 重新进入函数 +
switch跳到context.next记录的位置(同时接收next(value)传入的参数)
没有魔法,就是一个 switch 状态机 + 一个记录位置的数字,外加一个保存状态的 context 对象。
2.4 手写一个状态机版 Generator
1
2
3
4
5
6
7
8
9
10
11
12
13
14
15
16
17
18
19
20
21
22
23
24
25
26
27
28
29
30
31
32
33
34
35
36
37
38
39
40
41
42
43
44
45
46
47
48
49
50
51
52
53
54
55
56
57
58
59
60
61
62
63
64
65
66
67
68
69
70
71
72
73
74
75
76
77
78
79
80
81
82
83
84
85
86
function makeGenerator() {
  const context = {
    next: 0,          // 下一次进入 switch 的入口编号
    prev: 0,          // 当前执行的状态编号(用于 throw 定位 try 范围)
    done: false,      // 是否彻底结束
    sent: undefined,  // 存放 next(value) 传入的参数
    method: 'next'    // 记录外部调用的是 next / throw / return
  };

  // 状态机 —— 严格模仿 Babel 编译后的行为:返回裸值,由外层包装
  function innerFn() {
    while (true) {
      switch (context.prev = context.next) {
        case 0:
          context.next = 2;
          return 'hello';

        case 2:
          context.next = 4;
          return 'world';

        case 4:
          context.next = 6;
          return 'ending';

        case 6:
        case 'end':   // return() 会强制跳到这里,彻底终止
          context.done = true;
          return undefined;
      }
    }
  }

  return {
    // 1. next() —— 恢复执行
    next(value) {
      // 如果已经结束,后续调用直接返回终态(不再进入状态机)
      if (context.done) {
        return { value: undefined, done: true };
      }
      context.sent = value;
      context.method = 'next';
      const result = innerFn();        // 得到裸值
      return { value: result, done: context.done };
    },

    // 2. throw() —— 向内部注入错误(由于本示例无 try/catch,直接抛出)
    throw(error) {
      if (context.done) {
        // 规范要求:已结束的 Generator 调用 throw() 直接抛出错误(或返回终态)
        throw error;
      }
      // 标记为已结束(因为无 catch,错误会冒泡到外部)
      context.done = true;
      context.method = 'throw';
      // 真实场景下,如果内部有 try/catch,这里会跳转到对应的 catch case
      // 简单起见,这里直接将错误抛给外部调用者
      throw error;
    },

    // 3. return() —— 强制提前结束
    return(value) {
      // 强制将下一个入口指向 'end' 状态,让状态机直接终止
      context.next = 'end';
      context.done = true;
      context.method = 'return';
      return { value, done: true };
    }
  };
}

// ---------- 测试用例 ----------
const g = makeGenerator();

console.log(g.next());          // { value: 'hello', done: false }
console.log(g.next());          // { value: 'world', done: false }
console.log(g.return('提前结束')); // { value: '提前结束', done: true }

// 验证:return 之后再次调用 next,永远返回终态
console.log(g.next());          // { value: undefined, done: true }
console.log(g.next(123));       // { value: undefined, done: true } (参数被忽略)

// 测试 throw(单独运行下面代码看效果,需要注释掉上面的 return)
// const g2 = makeGenerator();
// console.log(g2.next());       // hello
// console.log(g2.throw(new Error('外部报错'))); // 直接抛出 Error: 外部报错
能跑,行为和原生 Generator 一致。这就是 Generator 在 ES5 环境下的实现原理。
三、参数传递:yield 的双向通信在编译后长什么样
上一篇讲过 yield 的双向通信——yield 往外产出值,next(value) 往内注入值。但当时没深入底层
3.1 带参数的 Generator 编译产物
源码:
1
2
3
4
5
6
7
8
9
10
function* gen() {
  const a = yield 1;
  const b = yield a + 1;
  return a + b;
}

const g = gen();
g.next();     // { value: 1, done: false }
g.next(10);   // { value: 11, done: false }
g.next(20);   // { value: 30, done: true }
编译后:
1
2
3
4
5
6
7
8
9
10
11
12
13
14
15
16
17
18
19
20
21
22
23
24
25
function gen$(_context) {
  var a, b; // Babel 会将所有变量声明提升到函数作用域顶部,此处模拟该行为

  while (1) {
    switch (_context.prev = _context.next) {
      case 0:
        _context.next = 2;
        return 1;

      case 2:
        a = _context.sent;     // next(value) 的参数在这里取出
        _context.next = 4;
        return a + 1;

      case 4:
        b = _context.sent;     // 同上
        _context.next = 6;
        return a + b;

      case 6:
      case "end":
        return _context.stop();
    }
  }
}
yield 表达式的「返回值」在编译后,来源变成了 _context.sent——也就是 .next(value) 调用时存入的 value。
前面 1.3 节 的wrap ,它把 generator.next 定义成:先 context.sent = value,再调用内部函数。也就是说,value 在进入状态机之前就被存入了 context.sent,等着对应的 case 来取。
yield 的双向通信,本质上就是通过 _context.sent 这个中转站完成的:
- 向外产出:
case里的return直接返回值 - 向内注入:
next(value)的参数存入_context.sent,在恢复后的case中赋值给变量
一端是暂停时的 return,另一端是恢复时的 _context.sent——它们被编译器提前配对好了。
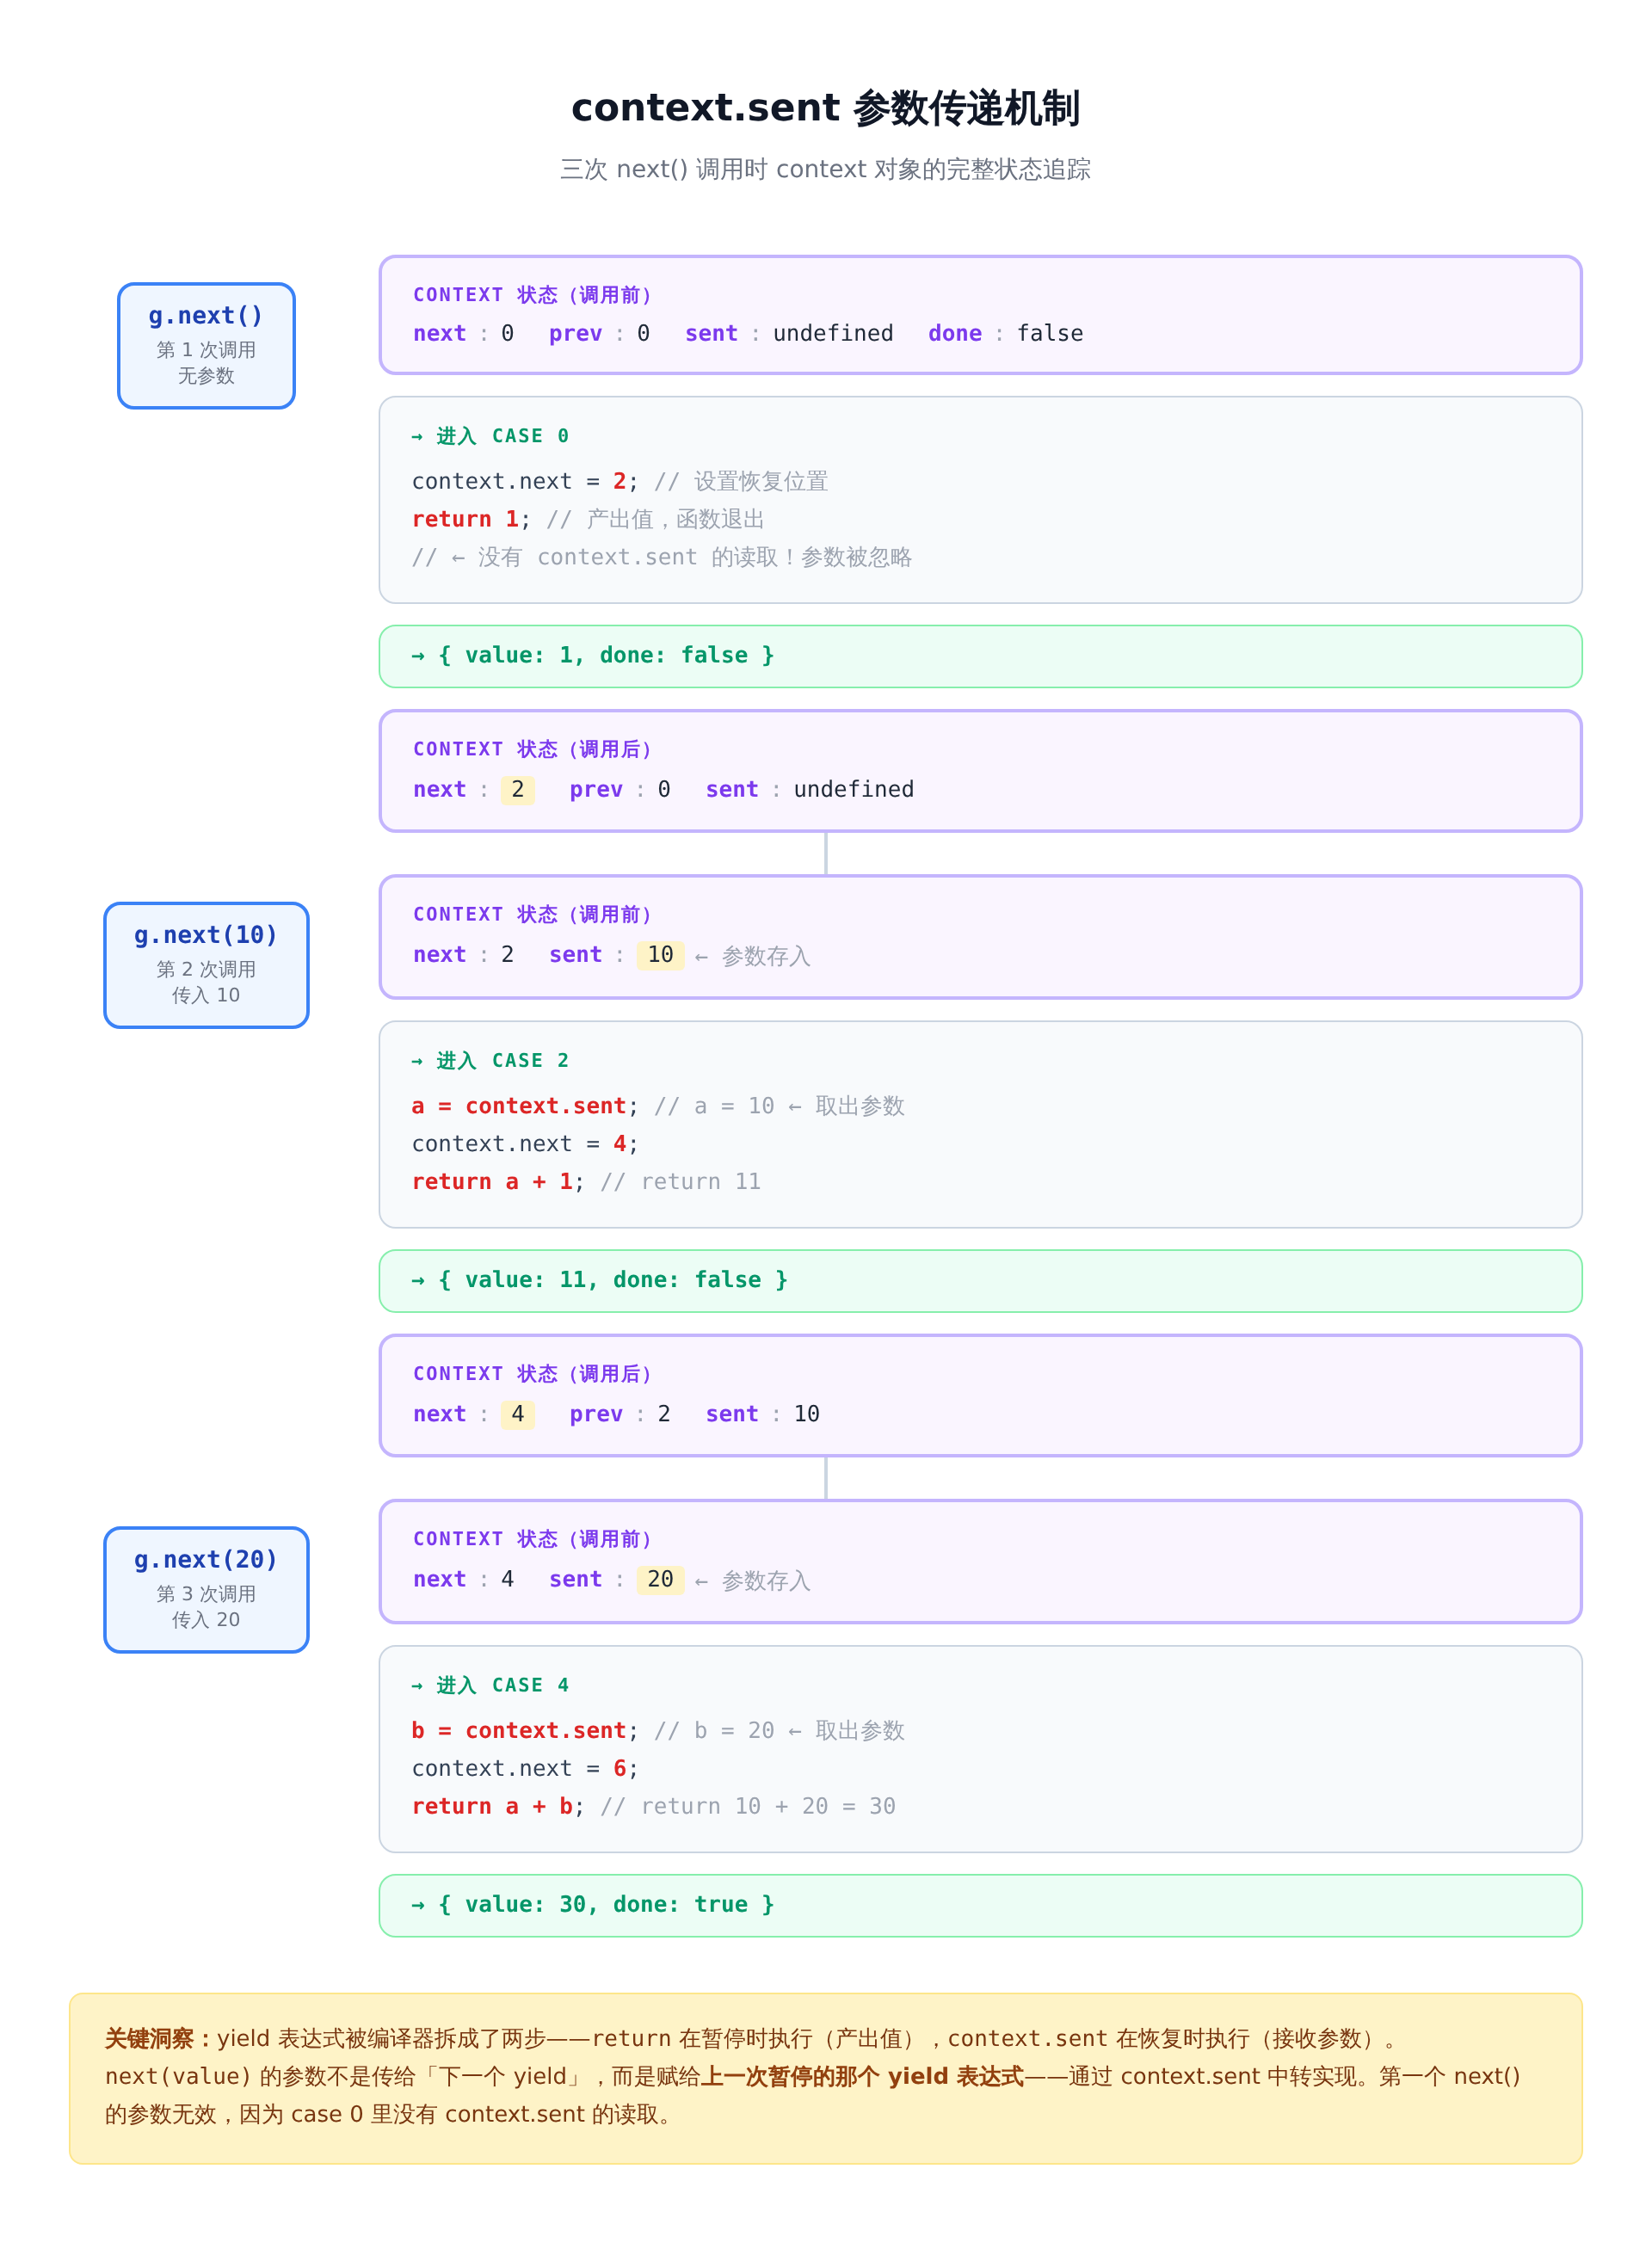
3.2 三次 next() 的完整过程
这一步很关键,建议自己先在脑子里走一遍,再往下看。
第一次 g.next():
wrap创建遍历器对象g,内部context = { next: 0, prev: 0, done: false, sent: undefined }- 调用
g.next()→context.sent = undefined(没传参数)→ 进入gen$(context) switch (context.prev = context.next)→context.prev = 0,进入case 0context.next = 2→ 记住下次从case 2继续return 1→ 函数退出,返回{ value: 1, done: false }
此时函数已经退出了。context 的状态:
1
2
context = { next: 2, prev: 0, done: false, sent: undefined }
//               ↑ 记住了「下次从 case 2 继续」
这就是「暂停」的真相:函数 return 退出了,但 context.next 记录了恢复位置。
第二次 g.next(10):
context.sent = 10→ 把参数 10 存入 context- 进入
gen$(context)函数 switch (context.prev = context.next)→context.prev = 2,进入case 2a = context.sent→ 把刚才存入的 10 赋给变量 acontext.next = 4→ 记住下次从case 4继续return a + 1→return 11,函数退出
此时 context 状态:
1
2
context = { next: 4, prev: 2, done: false, sent: 10 }
//               ↑ 下次从 case 4 继续    ↑ next(10) 传入的值
context.sent 就是 next(value) 参数的中转站。 wrap 在调用内部函数前先把 value 存进去,内部函数进入对应的 case 后,第一件事就是 a = context.sent 把它取出来。
第三次 g.next(20):
context.sent = 20→ 存入参数 20context.prev = 4,进入case 4b = context.sent→b = 20context.next = 6return a + b→return 10 + 20 = 30,函数退出
返回 { value: 30, done: true }。
3.3 yield 表达式被拆成了两半
const a = yield 1 这一行代码,在编译后被拆成了两步:
1
2
第一步(暂停时,case 0):return 1        → 产出值给外部
第二步(恢复时,case 2):a = context.sent → 接收外部传入的值
这两步跨越了一次函数退出和重新进入,但通过 context 对象串联在一起。
yield 表达式被编译器拆成了两半——return 在暂停时执行,context.sent 在恢复时执行。 这就是为什么 next(value) 的参数能赋值给「上一次暂停的那个 yield 表达式」——因为编译器已经把它们配对好了。
3.4 为什么第一个 next() 的参数无效
看第一个 next() 进入的 case 0:
1
2
3
4
case 0:
  _context.next = 2;
  return 1;
  // ← 没有 _context.sent 的读取!
整个 case 0 里根本没有 _context.sent 的读取操作。因为第一个 yield 之前不存在「上一次暂停的 yield 表达式」,所以第一个 next() 的参数无处可赋,被直接忽略。
从第二次 next(value) 开始,每个 case 的第一行都是 变量 = _context.sent——这才是参数生效的地方:
1
2
3
4
5
// 第二次 next(value) 进入的 case
case 2:
  a = _context.sent;  // ← 这里才读取参数
  _context.next = 4;
  return a + 1;
四、try/catch 在编译产物中长什么样
Generator 内部的 try/catch,编译后是怎么实现的?
4.1 问题在哪
普通函数的 try/catch 很简单——执行体抛错就跳到 catch。但 Generator 的执行是分段的——try 块里可能有 yield,意味着执行到一半会退出函数。下次 next() 或 throw() 进来时,怎么知道该跳到 catch 还是继续 try?
4.2 编译产物
源码:
1
2
3
4
5
6
7
8
9
function* gen() {
  try {
    yield 1;
    yield 2;
  } catch (e) {
    yield e.message;
  }
  yield 3;
}
编译后(简化):
1
2
3
4
5
6
7
8
9
10
11
12
13
14
15
16
17
18
19
20
21
22
23
24
25
26
27
28
29
30
31
32
33
34
35
36
37
38
39
40
41
42
43
44
45
46
47
48
49
// 修正后的 try/catch 完整编译产物示意
function gen$(_context) {
  while (1) {
    switch (_context.prev = _context.next) {
      case 0:
        // 标记 try 块开始位置(用于异常捕获判断)
        _context.prev = 0;
        _context.next = 2;
        return 1;

      case 2:
        _context.next = 4;
        return 2;

      case 4:
        // try 块正常执行完毕,设置跳转到 case 9 跳过 catch
        _context.next = 9;
        break;

      case 5:
        // catch 块入口(当外部调用 throw() 且 context.prev 在 try 范围内时触发)
        _context.prev = 5;
        // 假设 runtime 的 catch(5) 能根据之前的错误取出异常对象
        _context.t0 = _context.catch(5);
        _context.next = 8;
        return _context.t0.message;

      case 8:
        // catch 块执行完毕,跳转到 case 10 继续执行后续 yield
        _context.next = 10;
        break;

      case 9:
        // try 块正常退出的桥梁,直接跳转到 yield 3
        _context.next = 10;
        break;

      case 10:
        // 最后一个 yield
        _context.next = 12;
        return 3;

      case 12:
      case "end":
        // 终止执行
        return _context.stop();
    }
  }
}
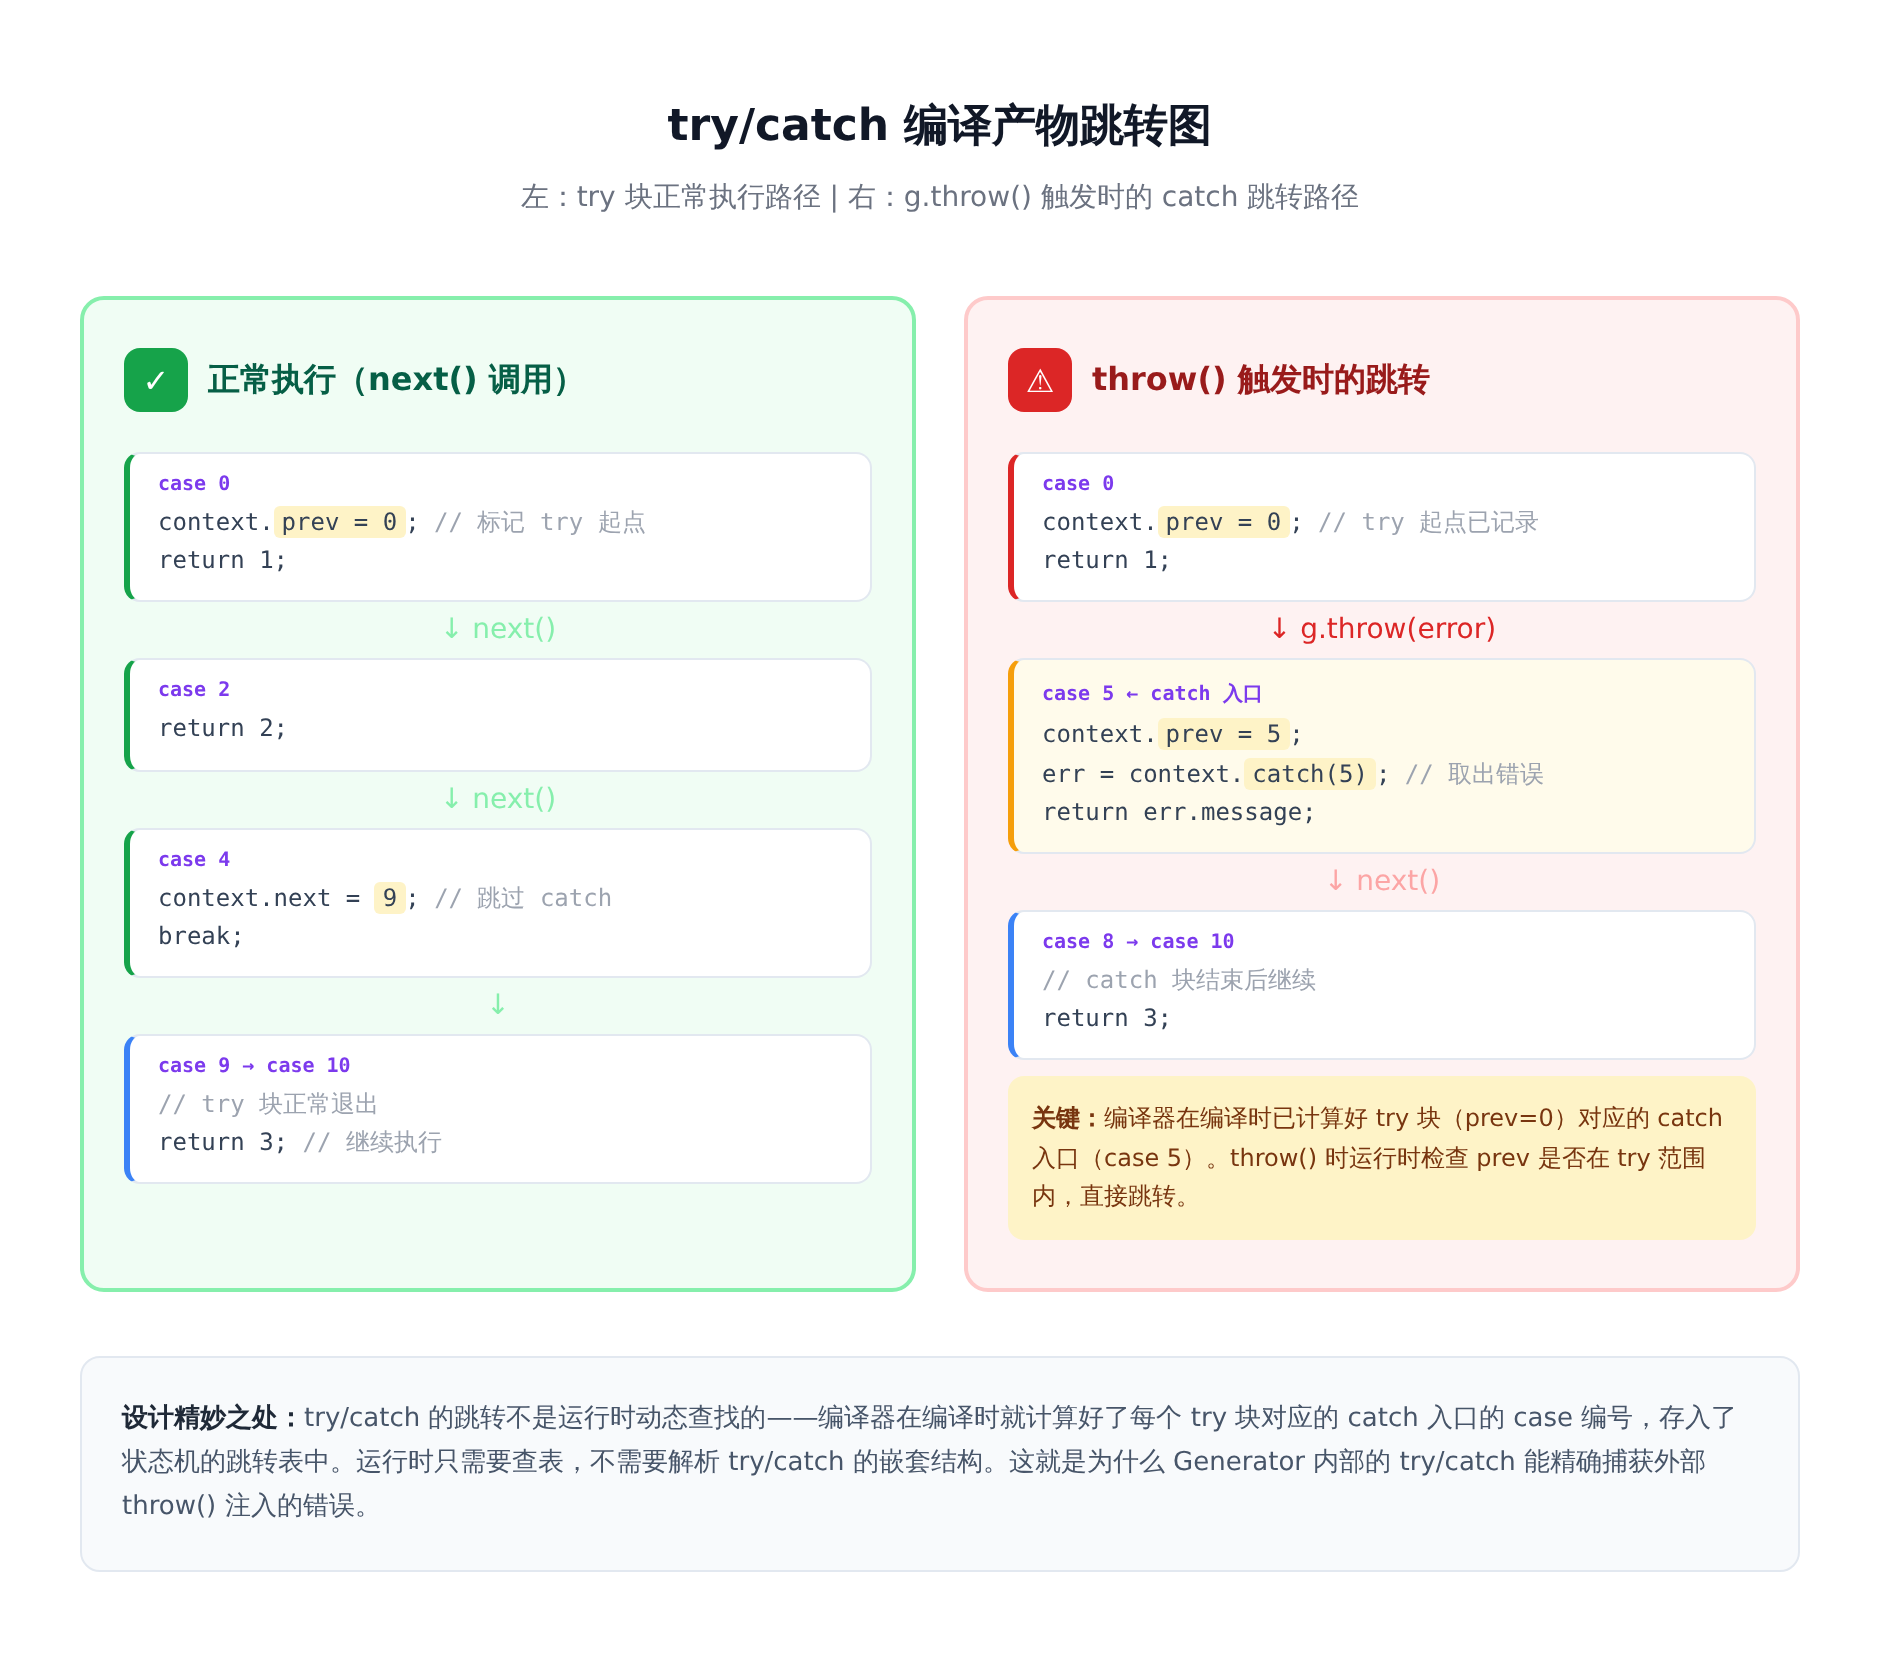
4.3 context.prev 的妙用
注意:_context.prev 在 try/catch 编译中承担了双重角色。
在前面的简单示例中,_context.prev 只是记录「上一次执行了哪个 case」。但在 try/catch 场景中,_context.prev = 0 这行代码出现在 case 0 里——它标记的是 try 块的开始位置。
这个设计很巧妙:
- 如果
try块内正常执行(yield 1→yield 2→ 退出),走到case 4时context.next = 9,直接跳过 catch 块 - 如果外部调用了
g.throw(error),wrap会把context.method设为'throw',regenerator 运行时检查到context.prev在try块范围内(0 到 4 之间),就会把执行跳到case 5(catch 块的入口),把错误通过_context.catch(5)取出来
编译器在编译时就已经计算好了每个 try 块对应的 catch 入口的 case 编号,存入了状态机中。 这就是为什么 g.throw() 能被 Generator 内部的 try/catch 捕获——不是运行时动态查找的,而是编译时就规划好了跳转路线。
一个看似简单的 try/catch,在状态机里被拆成了预计算好的 case 编号和跳转表。编译器做了大量的工作,让运行时只需要查表。
五、V8 引擎层面:原生 Generator 怎么暂停
前面的 Babel 编译产物是「ES5 polyfill」视角——用 JavaScript 代码模拟 Generator。但在现代浏览器和 Node.js 中,V8 引擎原生支持 Generator,不需要编译成 switch。
那 V8 是怎么做的?
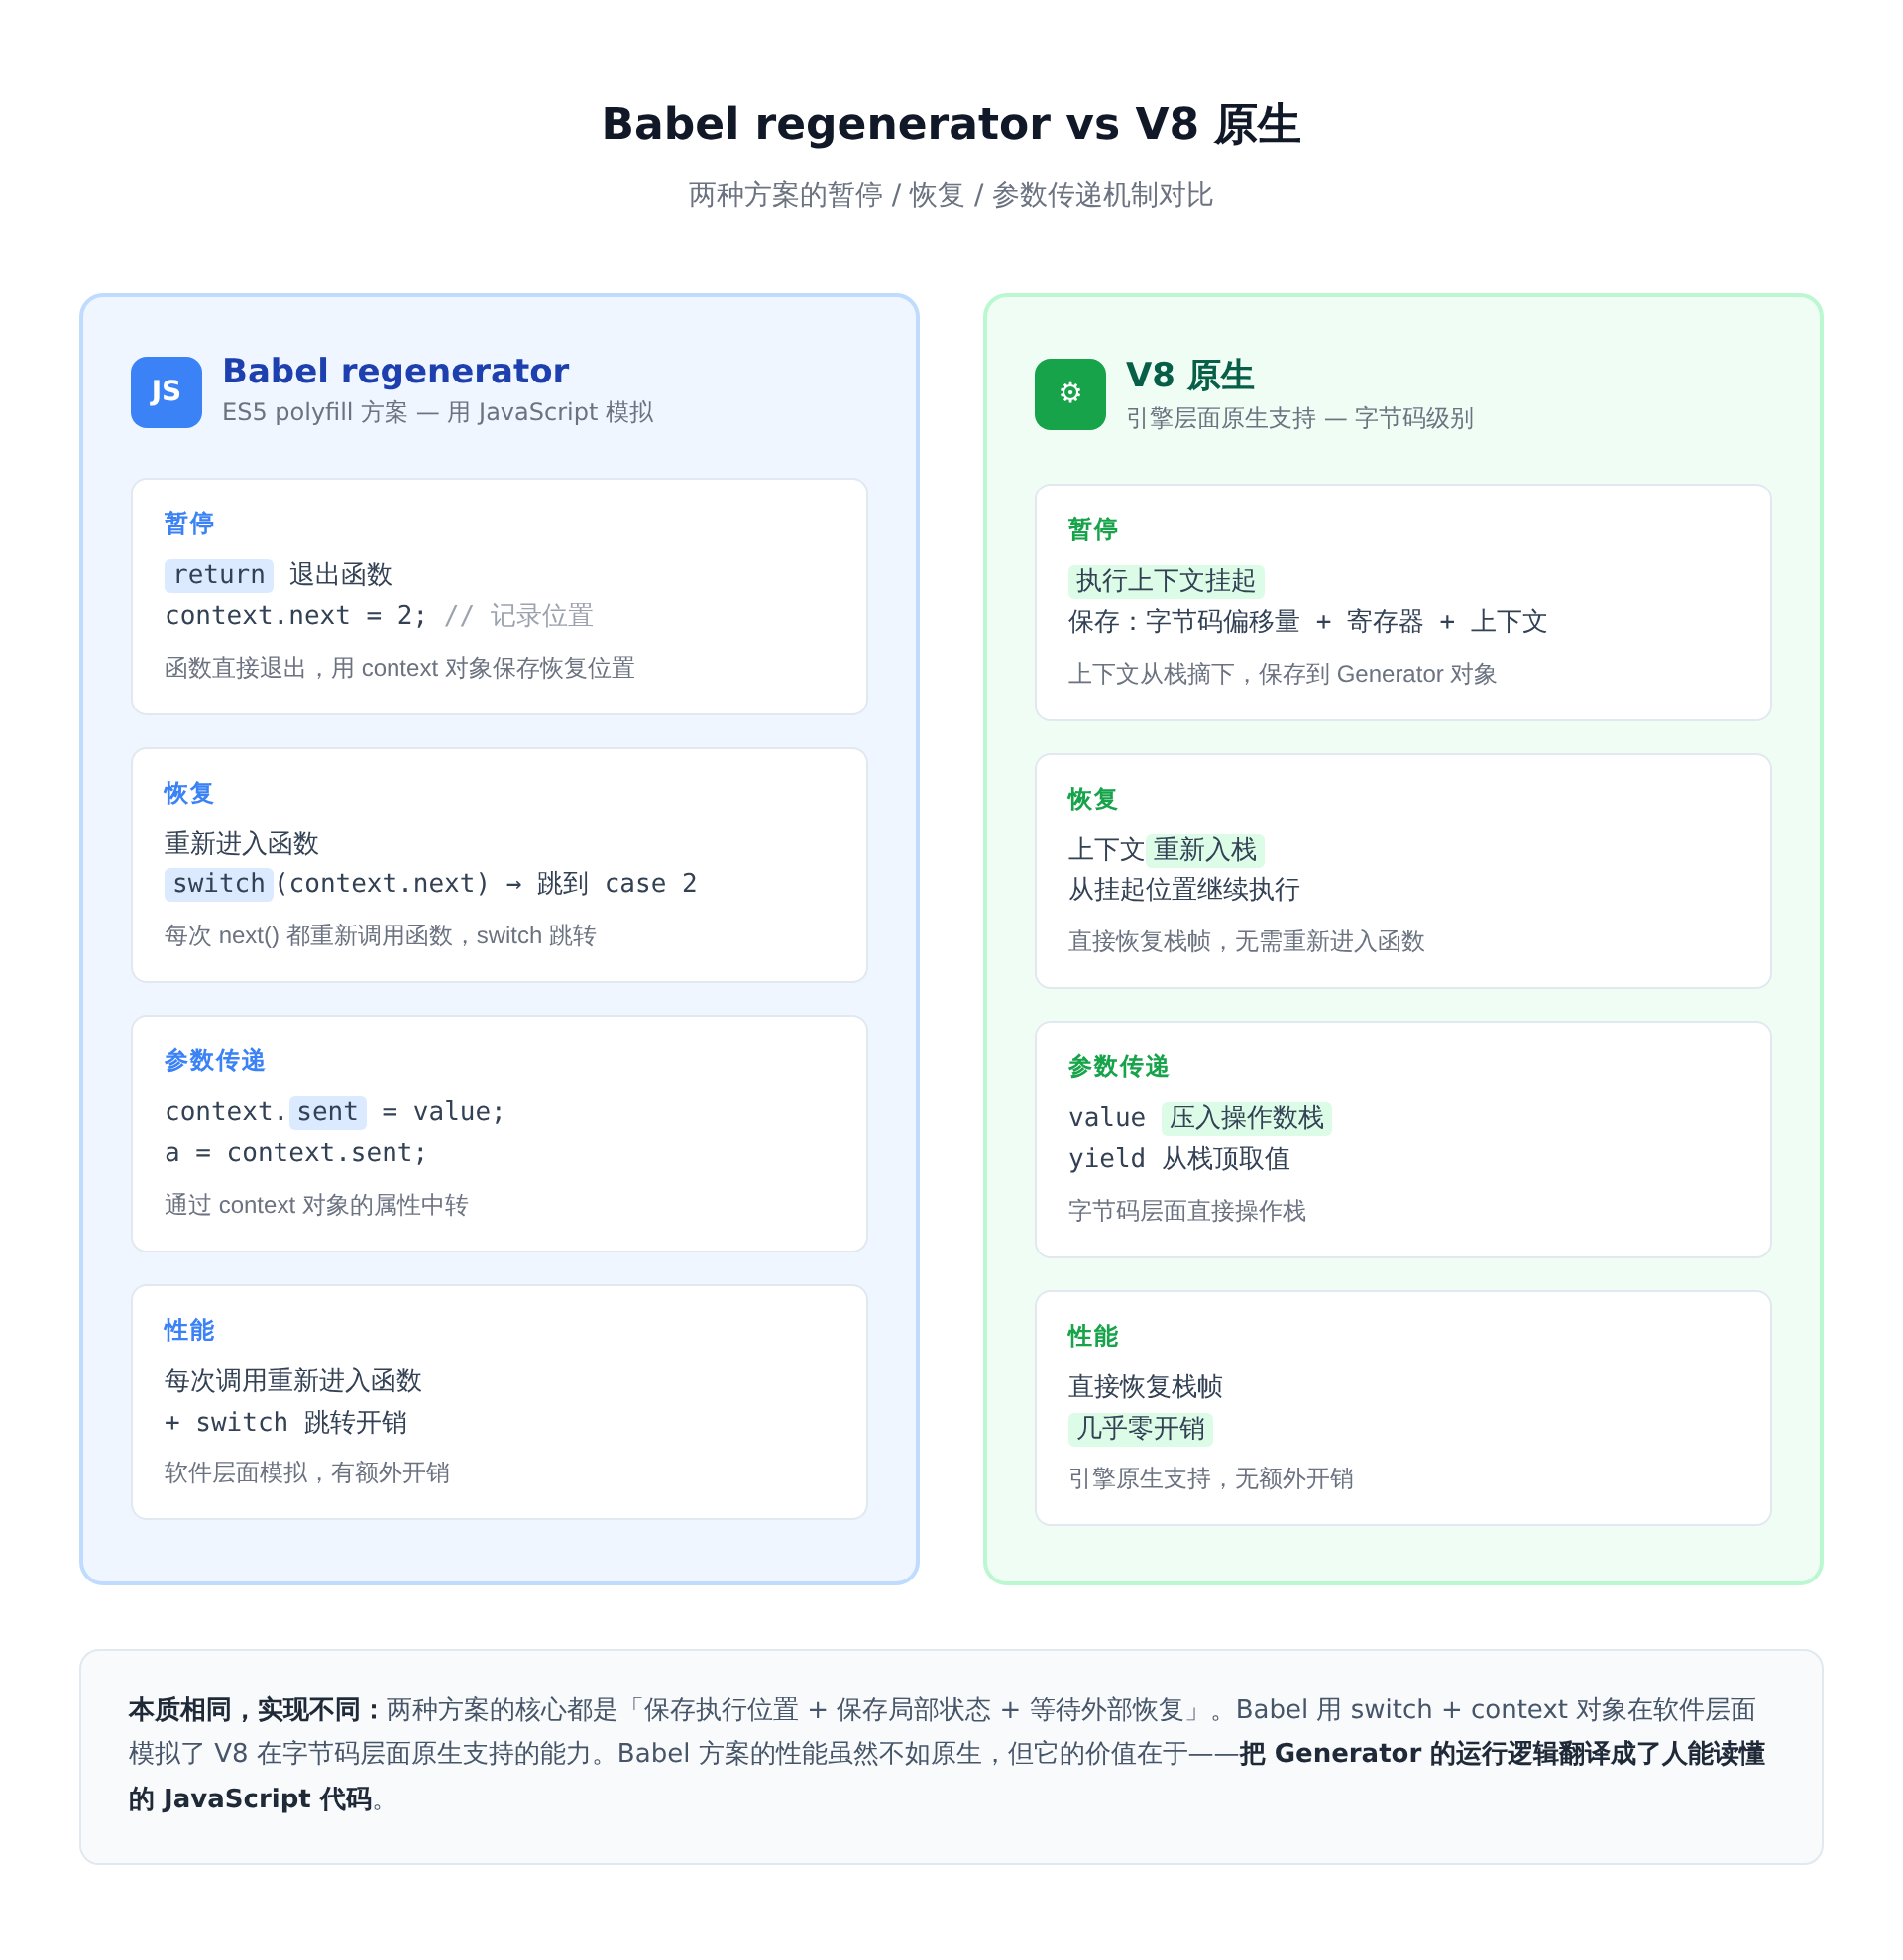
5.1 先对比一下两种方案
| Babel regenerator | V8 原生 | |
|---|---|---|
| 暂停 | return 退出函数 + context.next 记录位置 |
字节码层面的执行上下文挂起 |
| 恢复 | 重新进入函数 + switch 跳到对应 case |
挂起的上下文重新入栈 |
| 参数传递 | context.sent = value → case 内取值 |
参数直接压入操作数栈 |
| 性能 | 每次调用都重新进入函数,有 switch 跳转开销 | 直接恢复栈帧,远小于Babel方案 |
| 本质 | 用软件层面模拟暂停 | 引擎层面原生支持 |
5.2 V8 的实现思路
V8 使用 Ignition 字节码解释器执行 JavaScript。Generator 函数被编译成字节码时,V8 会在每个 yield 处插入特定的字节码指令来实现挂起。
关于 V8 的具体实现细节,以下基于 V8 的设计思路和公开的源码结构进行说明,部分细节可能随 V8 版本演进有所变化。
核心思路是——Generator 函数的执行上下文可以被「挂起」。
普通函数的执行上下文在函数执行完毕后出栈销毁。而 Generator 函数的执行上下文在 yield 处可以被「冻结」——V8 会保存当前的:
- 字节码偏移量(类似程序计数器,记录当前执行到哪条字节码)
- 寄存器文件(局部变量、临时值)
- 执行上下文(作用域链、this 绑定等)
然后把这个上下文从调用栈中摘下——不是销毁,而是保存到 Generator 对象内部。当 .next() 被调用时,V8 把这个上下文重新挂回调用栈,从之前冻结的位置继续执行。
5.3 Babel 方案 vs V8 方案的本质
对比一下两者的参数传递机制:
Babel 方案:
1
next(10) → context.sent = 10 → 进入 switch → a = context.sent → 继续
V8 方案:
1
next(10) → 上下文重新入栈 → 10 压入操作数栈 → yield 表达式从栈顶取值 → 继续
V8 不需要 context.sent 这种中转,因为字节码层面可以直接操作栈。yield 表达式在恢复时,直接从操作数栈顶取值——这就是 yield 的「返回值」。
但核心思路是一样的:保存执行位置 + 保存局部状态 + 等待外部传入参数后恢复。 Babel 用 switch + context 对象在软件层面模拟了 V8 在字节码层面原生支持的能力。
5.4 一个需要注意的点
前面讲的都是 V8 的实现思路。实际上不同的 JS 引擎(V8、SpiderMonkey、JavaScriptCore)在 Generator 的具体实现上可能有差异,但核心原理是一致的——都是通过保存和恢复执行上下文来实现暂停/恢复。
另外,Babel 的 switch 状态机方案虽然性能不如原生实现,但它有一个独特的价值——它让我们能读懂 Generator 的运行逻辑。V8 的字节码是给机器看的,而 Babel 编译后的 JavaScript 是给人看的。
小结
| 概念 | Babel 编译后 | 本质 |
|---|---|---|
function* |
regeneratorRuntime.mark + wrap |
原型链设置 + 遍历器创建 |
yield |
switch case + return |
记录位置 + 退出函数 |
next() |
重新进入函数 + switch 跳转 |
恢复到记录的位置 |
next(value) |
context.sent = value |
参数中转站 |
yield 的返回值 |
变量 = context.sent |
从中转站取值 |
try/catch |
预计算 catch 入口的 case 编号 | 编译时规划跳转路线 |
| V8 原生 | 字节码层面的上下文挂起/恢复 | 引擎原生支持 |
Generator 的「暂停」不是真的暂停——Babel 方案是 return 退出函数 + context 记录位置,V8 方案是字节码层面的上下文挂起。两者本质相同:保存位置 + 保存状态 + 等待恢复。
理解到这一层,你对 Generator 的认知就从「会用」到了「懂原理」。下一篇我们会讲 Generator 的自动执行器——怎么把手动调 next() 的痛苦去掉,以及 async/await 和 Generator 之间的关系。
-
Previous
ES2026 落地了什么?两个真上线的特性 + 两个被毙的,一次讲清楚 -
Next
React Compiler 用 Rust 重写了,编译提速 10 倍——手写 useMemo 的日子到头了
